|
This system achieves it's effect by using a combination of
Ultraviolet light, and very strong Hydrogen Peroxide to bleach the
yellow out of ivory. In order to accomplish this task, you will need
to obtain a few things which are not likely to be found in the
ordinary piano shop, specifically: 30% Hydrogen Peroxide (H202), 60% works better and
two fluorescent type, Ultraviolet lights.
 I purchased my H202 in a 60% concentration from a local supplier,
specialising in science materials for education and industry. After
telling them what I intended using it for, they recommended that I
buy it in it's stabilised form, explaining that the un-stabilised
mixture could, if handled incorrectly, be explosive.
I purchased my H202 in a 60% concentration from a local supplier,
specialising in science materials for education and industry. After
telling them what I intended using it for, they recommended that I
buy it in it's stabilised form, explaining that the un-stabilised
mixture could, if handled incorrectly, be explosive.
Once you've obtained this, combine (2) parts water and (1) part
H202, in a Non-Food Container. This will yield an overall
concentration of 10% H202. Pour this 10% solution into a pump/spray
bottle and add a few drops of liquid hand soap as a wetting agent.
It is this mixture which you'll use to bleach the keys. The
undiluted H202 should be sealed, and stored in a refrigerator until
needed for later usage.
Note: If you are unable to purchase 30% H2O2, adjust the amount of
water in your mixture, until you are able to achieve an approximate
10% concentration.
At this point, it would be wise to warn that both, the chemicals,
and the light source, mentioned in this article, are potentially
harmful to your health. Use adequate Eye, Respiratory, and Skin
protection. Heed all attendant warning labels. In addition, follow
all advice offered by the professionals from whom you purchase your
materials!
The lights which I use, are two (4 foot long) Sylvania 350,
40 Watt *Blacklights purchased from a local
lighting supplier. These are placed into an ordinary "light duty"
fluorescent lamp fixture, the fixture itself supported at both ends
(lights down) upon a workbench by two small sections of 2" by 4",
these lying on their 4" dimension.
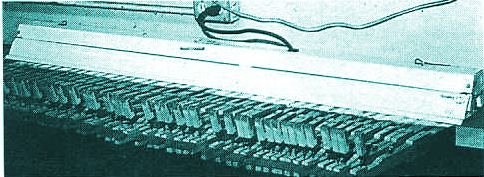
The keys being bleached will be placed directly beneath this
light fixture.
Using 320, or finer, grit sandpaper, lightly sand the ivory
keytops to be bleached. Following this, cover them with one layer of
Cheese Cloth (available at local grocery stores). The purpose of the
Cheese Cloth, is to distribute the H202 evenly upon the ivory, thus
preventing "puddling" of the chemicals, and over-bleaching of
selected areas.
Using your pump/spray bottle, spray a fine mist of the 10% H202
solution over the ivory.
Turn on the ultra violet light, and push the keys to be bleached
beneath it.
Keep checking the keytops from time to time. As the H202 evaporates,
you will need to occasionally re-wet the ivory with this bleaching
solution. Generally, satisfactory results are achieved in 48 to 72
hours. The whitening that actually takes place is more a function of
the amount of H202 applied than of the length of time the ivory
spends under the light. As such, it does no harm to leave the keys
under the light for a few days. In fact, the light should be left on
at all times during the bleaching procedure, including over night.
IT IS POSSIBLE TO DAMAGE THE IVORY BY OVER BLEACHING.
DO NOT USE TOO MUCH H202!
If the grain in the ivory begins to look extremely white; if the
ivory is already thin and begins to crack or lift; if the solution on
top of the keys begins to look foamy; if in doubt; Stop. Keep in
mind that you can always proceed further, if you wish, but you can't
undo what you've already done.
When you're satisfied with the bleaching that has taken place,
turn off the light, remove the keys from beneath it and wipe off any
residue left on the ivory with a damp cloth.
It is now necessary to sand the keytops in order to smooth out
any rippling or pitting which has been caused by the bleaching
procedure. Although you may do this by hand, I generally use an
orbital sander, supported upside down in a woodworking vise. Use 320
grit wet/dry sand paper; apply a few drops of water, and sand each
keytop just enough to smooth the surface. Usually about 30 seconds
each will do. Be constantly vigilant that you don't over-sand and
that the ivory remains flat and even. Using a dry cloth, wipe off
the resultant damp ivory-paste and buff out each key as you normally
would .

Congratulations you're finished.
A FEW LAST WORDS OF CAUTION...
Before undertaking this procedure on a customer's piano, experiment
with some keys of your own first. Always inspect the ivory on any
keyboard very closely before committing yourself. Although the heat
from the lights (about 82 degrees F.) and the bleaching solution does
not normally cause the ivory to loosen, if the heads or tails are
already getting loose, the bleaching procedure will cause them to
lift more. So make sure you've allowed yourself enough time in your
bid to reglue the loose ones. Also, remember that this procedure
does remove material. If the existing ivory is already thin, proceed
with extreme caution or not at all.
Over exposure to ultraviolet light may damage your eyesight. Do
not look directly into the light source. It would be wise to wear
sun glasses with U.V. protection, or to build some sort of shield
using U.V. blocking plastic film (available through a scientific
supply house).
Hydrogen Peroxide in the concentrations listed above can be
dangerous. Use proper Eye, Respiratory, and Skin protection at all
times.
There are many approaches to bleaching ivory, you can use a sponge instead of a spray to apply the Hydrogen Peroxide. and kitchen towel insted of cheese cloth. However, whichever method you use, you MUST make sure that all traces of Hydrogen Peroxide are removed from the keys before attempting any repair using AcryliKey. Hydrogen Peroxide reacts with the AcryliKey turning it pink. The most reliable way is, use a damp clean cloth then allow the ivory to dry then sand with 400-grit wet and dry.
Boots sell Hydrogen Peroxide 30 vol 9% your local hairdresser will be able to get 60 vol 17.5%.
*The black lights referred to above are UV "A" which are used in discos and not UV "B" which are used in sun tanning beds.
If you just wish to clean, plus take out mild yellowing in piano keys plus disinfect your piano keys we recommend Key-Brite
Barrie Heaton FIMIT, FABPT, MMPTA(USA),
|